Most of us find it useful, if not essential, to have a diary or calendar that reminds us of what is happening in our lives and what we need to do. Students with communication difficulties can have problems understanding and remembering what is happening and what is expected of them. This can be true even if they have good hearing skills or good memory skills. These difficulties can leave students feeling anxious about what is happening, particularly when they are worried about activities they don't like or find stressful. It can also mean that they don't understand when positive or preferred activities are happening as well.
Visual schedules (also known as visual timetables) provide visual information (real objects, photographs, pictures or words) about planned events. Visual schedules can provide information about:
- what is happening 'first and next'
- the steps in an activity
- the tasks to complete in a session
- the timetable of a whole day
- a weekly timetable or longer.
Visual schedules can help to reduce anxiety and confusion and to increase independence.
Using the schedules
Prior to developing visual schedules
- Choose the type of symbol to use (words, pictures, photos or a combination). The symbols you use should be based on what the student understands. Work with a speech pathologist if needed. Most of the time photos are easier to understand than pictures, e.g. a photo of the assembly hall will be more recognisable than a generic picture of a school hall.
- Use your knowledge of the student’s attention and comprehension to decide how much information to present. This could be a single step, e.g. a first – next visual), a session (3–4 tasks) or a whole day.
Steps in creating visual schedules include the following.
- Identify time/s of the day when visuals are needed. This could include transitions and other times of the day or week that are stressful for your students.
- Decide what you want to communicate to the students, e.g. the 2 steps in a transition or a visual list of activities to help promote independence in a work session.
- You should design the visual so that you (and the student) can see when items have finished. This could involve ticking them off or removing the pictures and putting them in a finished box.
- Write down what you want to put in the visual support
- Source photos, pictures or other materials from your own photos, online photo or picture sites or by hand drawing the pictures. You might need to take photos of specific tasks or places (e.g. a photo of the hall to show assembly time).
- Create the visual support. It is often best to create a blank schedule that you can put pictures on and take them off as needed. Pictures or photos can be printed separately and stuck to the schedule using blu-tack, Velcro or similar. Some teachers find it helpful to laminate visual schedules and pictures to make them more durable.
- Show the visual schedule to the student. Show them what the pictures represent. Teach them how to remove a picture when it is finished (or tick it off).
- Place the visual where the student can see it easily. This could be on the white board, the student’s desk or on a wall. Make sure the visual schedule is accessible to the student/s who need it.
- Use the visual schedule before and during the activities. It may be necessary to use a portable visual to take to different locations (e.g. a small visual that can be taken to the hall showing ‘First assembly, next sport’).
- Use simple language to accompany the pictures, e.g. ‘assembly is finished, time for sport’.
Learning to use visual schedules is a process and it may take some time for students to understand the purpose and benefit from them. Prompts and cues will be necessary at first, these should be gradually faded as the student learns to use the schedule.
Types of visual schedules
Visual schedules can be created to represent any period of time. This can include the following.
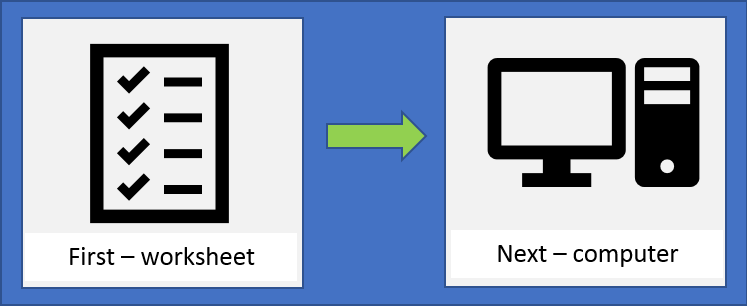
First – next reminders (e.g. 'first worksheet, next computers')
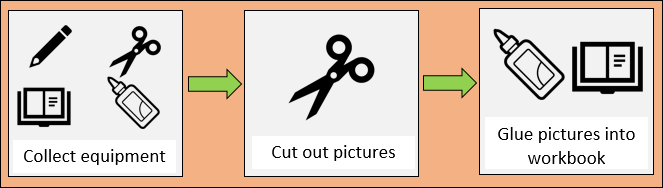
Activity steps, showing steps involved in completing an activity (e.g. '1. collect your equipment, 2. cut out the shapes, 3. glue them into your work book')
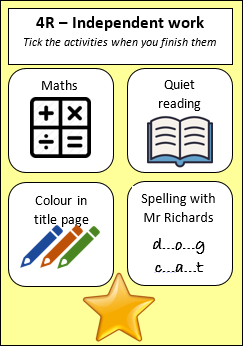
Activities schedule showing activities to be completed in a session (e.g. 'maths questions, spelling test with Mr Richards, colour in title page, quiet reading')
Daily schedules showing the main activities across a day. These can include more detail if needed or can simply highlight the important events in a day.

Weekly schedules, which show the main elements of a student’s weekly activities.
The Picture Communication Symbols ©1981–2010 by Mayer-Johnson LLC. All Rights Reserved Worldwide. Used with permission. Boardmaker™ is a trademark of Mayer-Johnson LLC
Age group
All ages, with different styles used as the student moves through school.
- Preschool: Yes – using predominantly photos/simple pictures including simple ‘first – then’ schedules
- P–2: Yes – using predominantly photos/simple pictures including simple ‘first – then’ schedules. Words included. Session, daily and weekly schedules appropriate
- 3–6: Yes – many students will cope with more abstract pictures and more written words. Session, daily and weekly schedules appropriate
- High school: Yes – consider the use of abstract pictures and more words, depending on the student’s needs
Learn more
- Raising Children Network website –
Visual supports
Hume, K. (2013).
Visual supports (VS) fact sheet. Chapel Hill: The University of North Carolina, Frank Porter Graham Child Development Institute, The National Professional Development Center on Autism Spectrum Disorders. -
Autism Internet Modules provide a way of learning online. You need to set up an account to access the modules. The modules are free. Visual supports is one of the intervention strategies available as a module.